TESLA MODEL X 2016 User Guide
Manufacturer: TESLA, Model Year: 2016, Model line: MODEL X, Model: TESLA MODEL X 2016Pages: 179, PDF Size: 4.3 MB
Page 11 of 179

Opening and Closing
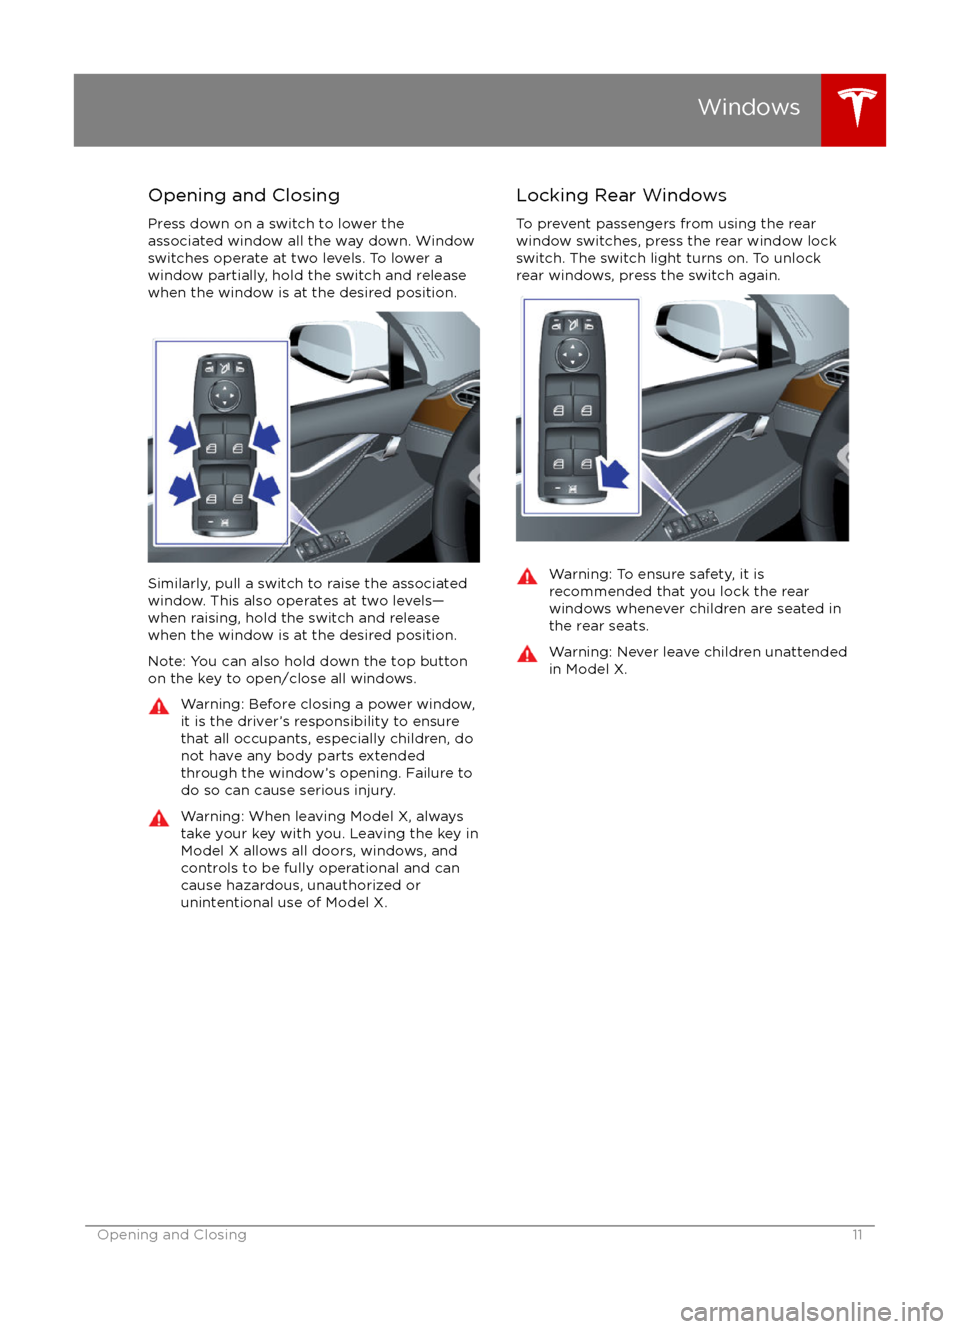
Press down on a switch to lower the
associated window all the way down. Window
switches operate at two levels. To lower a
window partially, hold the switch and release
when the window is at the desired position.
Similarly, pull a switch to raise the associated
window. This also operates at two levels
Page 12 of 179

Opening
To open the rear trunk, do one of the
following:
Page 13 of 179

Opening with No PowerIf Model X has no electrical power, you can
open the rear trunk from inside. Use the
mechanical release cable located on the underside of the liftgate, next to the interiorlight.
1. Remove the cover by pulling its lower edge very firmly toward you.
2. Pull the cable to release the latch.
3. Push the liftgate open.
Rear Trunk
Opening and Closing13
Page 14 of 179

Opening
To open the front trunk: Touch ControlsFront Trunk on the
touchscreen, or double-click the front
trunk button on the key.
Pull the hood up.The door open indicator displays on
the instrument panel when the front
trunk is open. The image of the
Model X on the touchscreen Controls window also displays the open trunk.
The front trunk locks whenever Model X is
locked using the touchscreen, externally using
the key or walk-away locking, or when Valet
mode is active (see Valet Mode).
To open the front trunk in the unlikely
situation in which Model X has no electrical
power, see Opening with No Power .
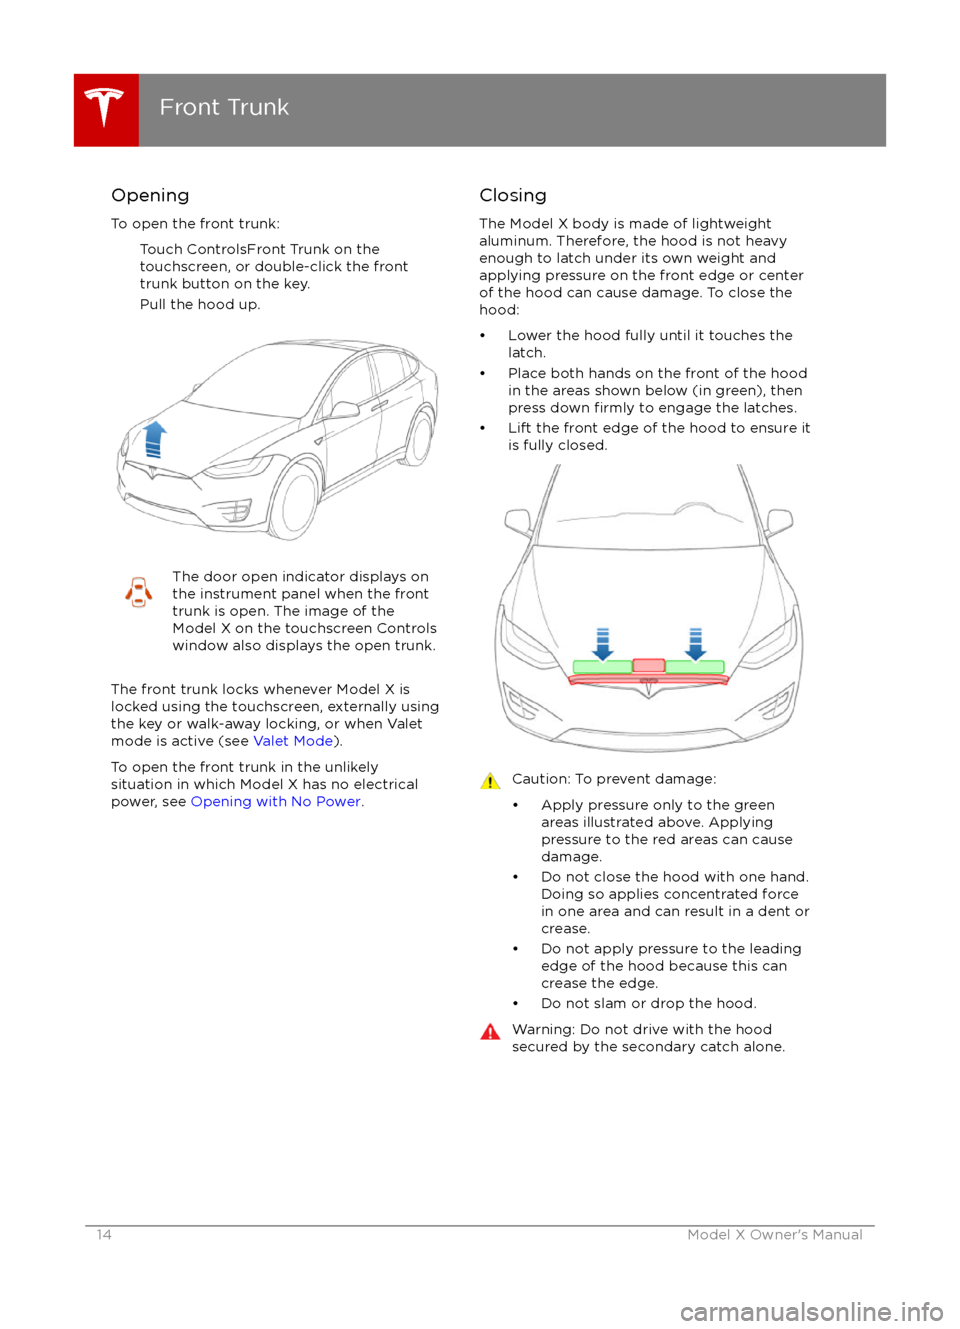
Closing
The Model X body is made of lightweight
aluminum. Therefore, the hood is not heavy
enough to latch under its own weight and
applying pressure on the front edge or center of the hood can cause damage. To close the
hood:
Page 15 of 179

Interior Emergency ReleaseAn interior release button inside the front
trunk allows a person locked inside to get out.
This release button is active whenever
Model X is stationary.
Press the interior release button to open the
front trunk, then push up on the hood.
Note: The button glows for several hours after
a brief exposure to ambient light.
Opening with No Power
If Model X has no electrical power, or if you are
unable to open the front trunk using the touchscreen or key, follow these steps to openit:
1. Remove the tow hook cover located in the lower front of Model X. To do so, insert a
small
flat screwdriver into the slot located
along the top of the cover, then pry gently
to release the cover from the top snap.
2. Locate the two straps. One of these straps
is labeled
Page 16 of 179

Opening and Closing
To open the glove box, press the switch located on the side of the touchscreen. If you
leave the glove box open for
five minutes, its
light automatically turns off.
Note: The glove box locks whenever Model X is locked externally, using the key or walk-
away locking. It also locks when Model X is in Valet mode (see Valet Mode on page 36). It
does not lock when Model X is locked using
the touchscreen.
Warning: When driving, keep the glove
box closed to prevent injury to a
passenger if a collision or sudden stop
occurs.
Glove Box
16Model X Owner
Page 17 of 179

Opening and Closing
To expose a front cup holder, slide back the armrest.
To expose rear cup holders, press and release
the cup holder face plate located at the back
of the center console.
Cup Holders
Opening and Closing17
Page 18 of 179

Correct Driving PositionThe seat, head restraint, seat belt and airbags
work together to maximize your safety. Using
these correctly ensures greater protection.
Position the seat so you can wear the seat belt correctly, while being as far away from the
front airbag as possible:
1. Sit upright with both feet on the
floor and
the seat back reclined no more than 30
degrees.
2. Make sure you can easily reach the pedals and that your arms are slightly bent whenholding the steering wheel. Your chest
should be at least 25 cm from the center
of the airbag cover.
3. Place the shoulder section of the seat belt mid-way between your neck and your
shoulder. Fit the lap section of the belt tightly across your hips, not across your
stomach.
Model X seats include integrated head
restraints. The front driver and passenger head restraints can be adjusted to a high or low
position.
Adjusting the Driver
Page 19 of 179

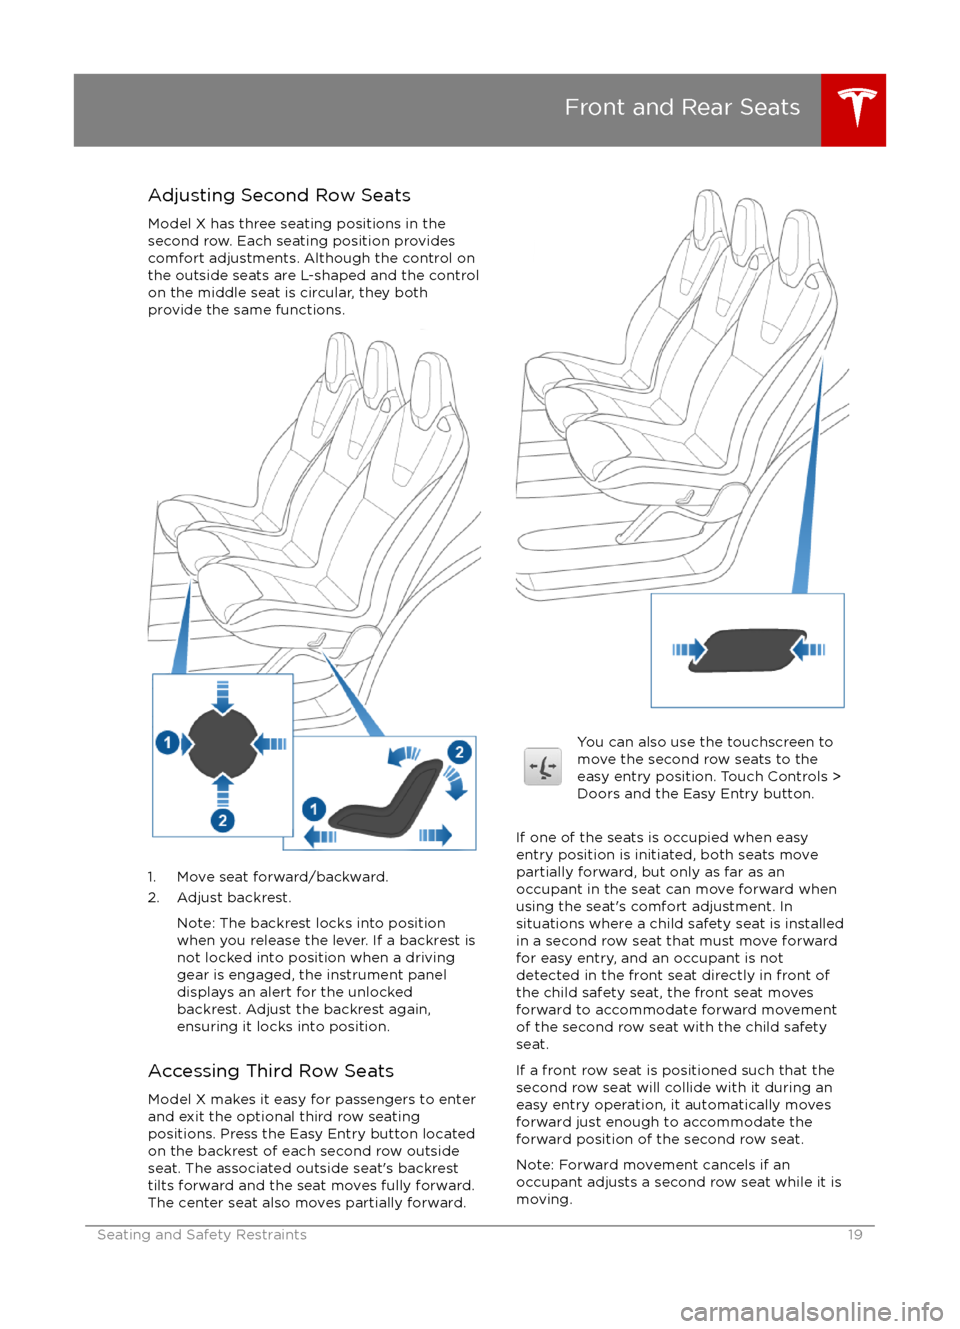
Adjusting Second Row SeatsModel X has three seating positions in the
second row. Each seating position provides
comfort adjustments. Although the control on
the outside seats are L-shaped and the control
on the middle seat is circular, they both provide the same functions.
1. Move seat forward/backward.
2. Adjust backrest.
Note: The backrest locks into position
when you release the lever. If a backrest is
not locked into position when a driving
gear is engaged, the instrument panel
displays an alert for the unlocked
backrest. Adjust the backrest again,
ensuring it locks into position.
Accessing Third Row Seats Model X makes it easy for passengers to enterand exit the optional third row seating
positions. Press the Easy Entry button located
on the backrest of each second row outside seat. The associated outside seat
Page 20 of 179

Note: When an outside seat has tilted forward
for easy entry, its back rest resets to the
neutral position and may need to be re-
adjusted.
Note: If an obstacle is detected while a seat is
moving forward for easy entry, forward
movement stops and the seat moves back.
Folding Third Row Seats
Before folding, remove items from the seats
and the rear foot well. To allow the third row
seat backs to fold completely
flat, you may
need to move the second row seats forward.
To fold a third row seat, press the button
located in the top outside corner of the seat.
The button has two detents.
1. Fold head restraint forward.
2. Fold seat forward.
You can also use the touchscreen to fold third
row seats. Touch Controls > Doors > Rear
Seats. A convenient way to fold rear seats is to engage Cargo Mode (described next).
Note: If necessary, the second row seat may
move forward slightly to accommodate the forward position of the third row seat.
Note: To raise the seats, pull the seat back
upward until it latches into place. To
confirmthe seat back is locked in the upright position, try pulling it forward.
Warning: Always ensure the seat backs
are locked in their upright position.
Failure to do so increases the risk of injury.Cargo Mode
Cargo Mode makes it easy for you to
maximize cargo space by automatically
moving all second row seats fully forward and
folding the third row seats
flat. Touch
Controls > Doors > Rear Seats > Cargo Mode
on the touchscreen.
Note: Cargo mode is prohibited if a second or
third row seat is occupied.
Head Restraints Front seats include adjustable non-removable
head restraints. Use the touchscreen to adjust
these head restraints to either a low or high
position.
The second and third row seats have
integrated non-removable head restraints that
can not be adjusted. However, the head
restraints in the third row seats can be folded
down for storage (see Folding Third Row
Seats on page 20).
Seat Heaters
The front seats are equipped with heating
pads that operate at three levels from 3
(highest) to 1 (lowest). To operate the seat
heaters, see Climate Controls on page 105.
If Model X is equipped with the optional cold
weather package, you can also control seat
heaters in the second row and rear seats, as
well as heated wipers by touching Controls >
Cold Weather (see Controls on page 97).
Seat Covers Do not use seat covers on Model X. Doing so
could restrict deployment of the side air bags
if an accident occurs. It can also reduce the
accuracy of the occupant detection system.
Front and Rear Seats
20Model X Owner